Overview
Google Cloud Managed Service for Microsoft Active Directory (“Managed AD”) is a premium managed service offered by Google to host and manage a customer’s new Microsoft Active Directory (AD) domain in Google Cloud.
What is Active Directory?
According to the Active Directory page on Wikipedia,
Active Directory (AD) is a directory service developed by Microsoft for Windows domain networks. It is included in most Windows Server operating systems as a set of processes and services.
A Windows server running the Active Directory Domain Service (AD DS) role is called a domain controller. It authenticates and authorizes all users and computers in a Windows domain type network, assigning and enforcing security policies for all computers. Computers that have been “joined” to the domain are under the security policy umbrella of the domain.
Active Directory uses Lightweight Directory Access Protocol (LDAP) versions 2 and 3, Microsoft’s version of Kerberos, and DNS.
Active Directory
Organizations of any size ranging from a small number of Windows servers or desktops to the largest enterprises with thousands of servers most likely have an Active Directory domain. These can be simple configurations with just a few domain controllers, or incredibly complex configurations with multiple sites, clusters, and different types of domain controllers. All types of organizations consider it a critical piece of infrastructure for their Authentication, Authorization, and Auditing (AAA) platform.
Any number of internal and external enterprise self-hosted or Software-as-a-service (SaaS) applications and hardware appliances (storage arrays for example) can integrate with and rely on AD for authenticating access to the application and its data.
The ability to interact with AD is built-in to Windows Servers and Desktop operating systems, and has been extended to Linux through open LDAP implementations or other methods.
What is Google Cloud Managed Active Directory?
“Google Cloud Managed Service for Microsoft Active Directory” was made generally available in February of 2020 as an “Active Directory-as-a-service” for customers that need Active Directory but do not want to manage the underlying aspects of it, such as supporting/managing/patching/securing the underlying Windows operating system, security best practices around AD configuration, or other areas.
Implementation
When first deployed, the service consists of two AD Domain Controller Google Compute Engine (GCE) instances per region in non-overlapping zones, in a private Google-managed project with a VPC and Cloud DNS that is created solely for the Managed AD domain and is not shared with other customers.
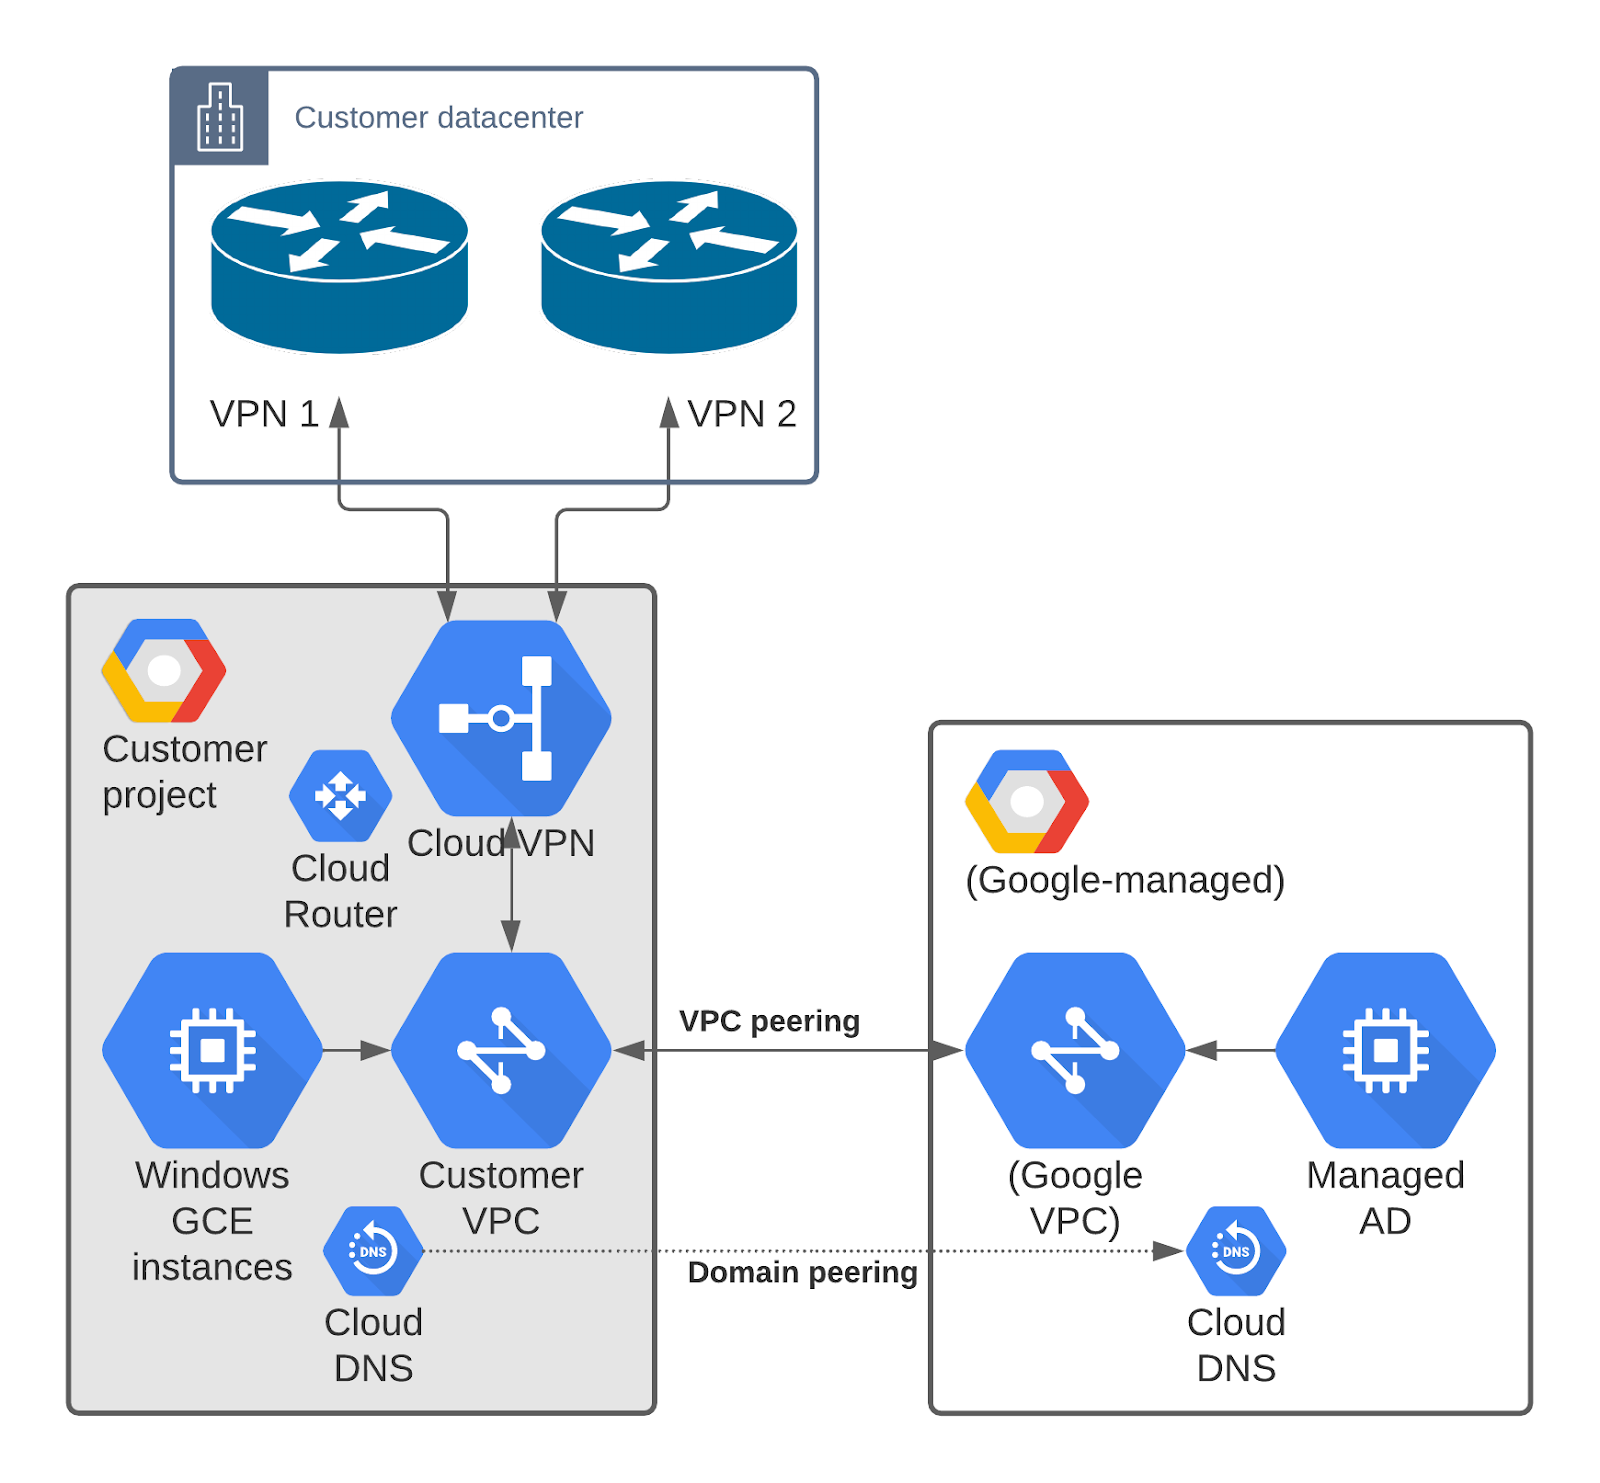
The private Google-managed project is not visible or accessible to the customer, but the Domain Controller instances are reachable over the VPC peering connection established between the customer’s VPC and the Google-managed VPC.
The domain can be expanded to four additional regions. Each region is about $292/month.
Google indicates the customer is not charged additionally for the necessary Windows licensing to operate the service. That being said, there is not an option to BYOL Windows licensing for Managed AD. See Microsoft Licensing Guide for Google Cloud for general details.
Additionally, if not already present, Cloud DNS is enabled and configured in the customer project with a domain peering zone for the AD domain which points to the Domain Controller instances in the Google-managed project. This enables GCE instances or other servers to resolve the Managed AD domain using Cloud DNS.
Managed AD is accessible to GCE servers in the project or other VPCs as long as appropriate peering and routing have been configured. On-premise servers are also able to access Managed AD via established VPN or Interconnect connections with similarly appropriate routing and DNS configuration.
Initially the Managed AD VPC is peered with a single customer VPC, but can be can be peered to 5 additional VPCs to permit additional access to the service by hosts in other VPCs.
Managed AD is generally compatible with identity providers such as Okta, but may require special configuration in order to work properly. During installation, the Okta agent attempts to create its own service account which will fail. If the service account is created manually ahead of time, and granted limited permissions, the Okta installer can use the service account instead of creating a new one, and then installation will succeed.
Group Policy is also supported in Managed AD in specific OUs only.
Backups take place every 12 hours, and on-demand backups can be triggered when needed. Restoration from backups is also available and can take up to 90 minutes, during which the domain is not available.
Limitations
As a managed service, there are limitations to what a customer can do with Managed AD. These limitations ensure the service remains a “managed” service and not a “co-managed” service.
Managed AD cannot become part of an existing AD domain, whether on-premise or in GCP. Domain Controllers for Managed AD cannot be deployed on-premise or as GCE instances in a customer project – they run only in the Google-managed project in Google Cloud.
A user cannot RDP to or otherwise access Domain Controller servers, except as an authentication mechanism to a domain resource.
The domain and underlying GCE instances cannot be backed up using 3rd-party backup utilities since they are not part of the customer’s project or organization.
Active Directory DHCP cannot be used, but Active Directory DNS is part of the deployment and integrated with Cloud DNS.
The “Domain Admins” group long-beloved by administrators is not accessible to the customer. Instead, the customer must use the “Cloud Service Administrators” Global group in the “Cloud Service Objects” OU which grants customer-level administrative permissions to the users who would typically utilize the Domain Admin role.
If using Okta, the Okta service account should be a member of “Cloud Service Administrators” and will then be able to provision accounts in the “Cloud” OU.
The “Cloud Service All Administrators” Domain Local group is available for use and has the same level of permissions as “Cloud Service Administrators” but due to its group type, can include users from other trusted domains.
Other administrative-level groups such as “Enterprise Admins” “BUILTIN\Administrators”, and “Schema Admins” are not available to the customer.
Various AD objects are automatically created in the Managed AD domain – only the “Cloud” OU and any sub-OUs within it are customer managed. All customer users, groups, and computer objects must be placed in the “Cloud” OU.
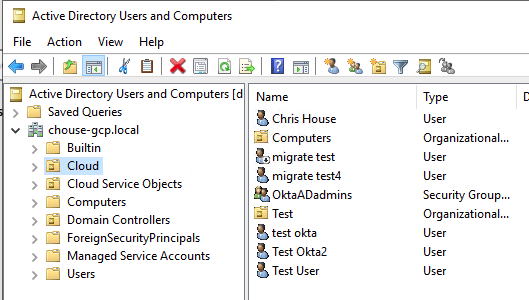
Any customer Group Policies can only be attached at the “Cloud” OU level or a sub-OU as appropriate. The default domain policy and other pre-existing policies cannot be modified.
When the Managed AD domain is deployed, an initial “setupadmin” account is created a member of “Cloud Service Administrators”. This account should be used to establish other administrative accounts. Once other accounts are present, the account should no longer be used. Its password can be reset as needed via the Google Cloud Console.
Some domain-level permissions are currently restricted, such as setting sIDHistory on an object. This may impact third-party management or migration utilities when interacting with or migrating to a Managed AD domain.
However, the domain-level administrative task of establishing trusts can be performed by the customer, but only through the Google Cloud Console instead of the Active Directory Domains & Trusts snap-in.
UPDATE: As of Sept 6, 2022, the ability to extend the schema with custom attributes to support utilities such as LAPS is now available in public preview.
Deployment
To deploy, access the Security area of Google Cloud Console and select “Managed Microsoft AD“. A number of different IAM roles are available. The role “roles/managedidentities.admin” has all necessary permissions.
Some prerequisites must be established prior to creating a new domain in a Google Cloud project:
- Fully qualified AD domain to use which fits the naming standard for the organization and should not conflict with any existing domain inside or outside the organization. Domains do not need to be registered with any domain registry.
- VPC networks to peer with
- /24 CIDR range (subnet) to use for the Managed AD domain controllers, which does not conflict with any other CIDR range on-premise or in the customer VPCs. The CIDR range cannot be smaller than a /24.
- Initial Admin username to create. Default is “setupadmin” but can be changed to suit the customer.
If using Shared VPCs, Managed AD should be deployed to the host project so that it can peer with the VPC.
Management
Once the domain is deployed, it can be managed like any other AD domain using established Microsoft utilities.
Prior to being able to manage the domain, a Windows GCE instance should be deployed and then joined to the domain by providing the domain FQDN and the “setupadmin” username and password. The resolution of the Managed AD domain FQDN is made possible by the domain peering in Cloud DNS which the GCE instance will rely on.
Once joined to the domain and rebooted, RDP to the instance as the “setupadmin” user and then install several different Features from the Roles & Features area of Windows Server Manager:
- Group Policy Management
- Remote Server Administration Tools: AD DS and AD LDS Tools, DNS Server Tools (DHCP Server Tools are not necessary)
To manage AD objects, use Active Directory Users and Computers as usual, keeping any changes within the “Cloud” OU.

Use Group Policy Management to manage Group Policies as usual, again confining any modifications to the “Cloud” OU.

On-premise access to Managed AD
As mentioned earlier, due to the nature of the implementation of Managed AD through a VPC peer, other networks are able to access Managed AD as long as appropriate peering and routing is configured, including on-premise networks and servers.
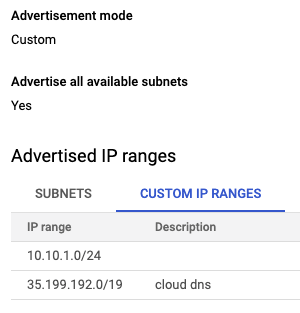
First, to help on-premise devices know how to reach the Managed AD subnet, the Cloud Router associated with the VPN or Interconnect attached to the same project as Managed AD must advertise a static route for the Managed AD subnet, as well as the Cloud DNS query source IP range.
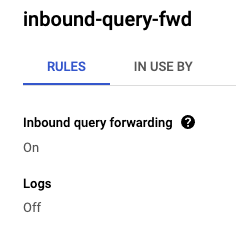
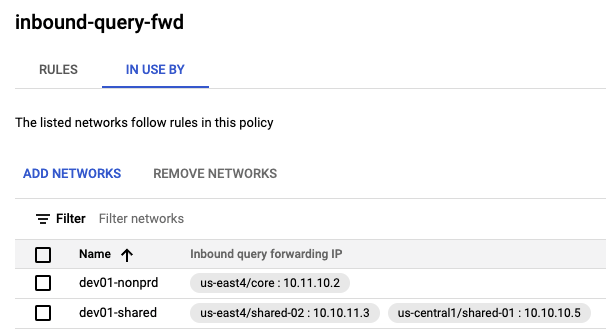
Next, Cloud DNS in the project that has the Managed AD domain where the domain peering zone for Managed AD is present must be configured with a DNS policy permitting inbound query forwarding and associated with the necessary VPCs. This will reserve IPs in all subnets on the VPCs for Cloud DNS. The IPs will be capable of responding to DNS queries sent by on-premise servers.
Active Directory Trusts
Managed AD can establish one-way or two-way trusts with self-managed AD domains, either on-premise or within GCP.
Proper DNS resolution is critical for trusts to be established and maintained.
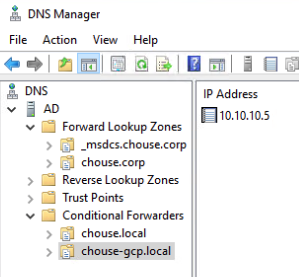
In order for a self-managed AD domain to trust the Managed AD domain, the self-managed Active Directory DNS service must be configured with a Conditional Forwarder for the Managed AD FQDN using the Cloud DNS inbound query forwarding IPs that were previously reserved from associated VPCs.
In the screenshot below, 10.10.10.5 is a VPC subnet IP reserved for Cloud DNS so the self-managed AD domain “chouse.corp” can resolve the Managed AD domain “chouse-gcp.local” by forwarding DNS requests to 10.10.10.5.
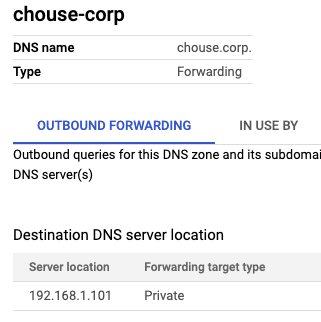
Conversely, Cloud DNS must be configured with private zone forwarding to forward DNS requests for the self-managed AD domain to the self-managed AD domain DNS servers.
Below, a private forwarding zone is created called “chouse.corp” with a Destination DNS server of 192.168.1.101, which is the domain controller/DNS server for “chouse.corp”. DNS requests by GCE instances or Managed AD for “chouse.corp” to Cloud DNS will be forwarded to 192.168.1.101. From 192.168.1.101’s perspective, the requests will originate from the Cloud DNS query source IP range 35.199.192.0/19 even though the traffic comes over the VPN, so it is important that a static route be advertised for this network so that requests can return back over the same VPN connection.
Once DNS configurations are in place both in Cloud DNS and self-managed AD DNS, use the Google Cloud Console to create a new trust between Managed AD and the self-managed domain. This process only establishes the trust on the Managed AD side. The trust from the self-managed side will be established separately.
Simply provide the FQDN of the self-managed domain, the DNS server IPs of the self-managed domain (which will be configured in Managed AD’s DNS service as Conditional Forwarders) and finally a trust password which needs to be used on both sides of the trust, but will be automatically changed periodically by Active Directory and does not need to be saved. The trust password acts like a pre-shared key in that both sides of the trust need to use the same password when establishing and maintaining the trust.

Use Active Directory Domains and Trusts in the self-managed domain to establish the trust going the other way, to Managed AD, by providing the FQDN of the Managed AD domain and the trust password. Be sure to match the trust Type and Direction. Do not validate the trust when prompted to provide Managed AD credentials – this will fail.
Verify in Cloud Console that the trust is now Active.
Going forward
Now that Managed AD has been deployed, routing and DNS has been configured, and a trust has been established, Windows servers and desktops on-premise, in GCP, or elsewhere can join the Managed AD domain and AD users in trusted domains can access these servers with appropriate permissions.
UPDATE: Good overview of trusts in Active Directory