Author Archives: chouse

Site to Site VPN between Google Cloud and pfSense on VMware at home

I’ve always wanted to set up a Site to Site VPN between a cloud provider and my home network. What follows is a guide inspired by Configure Google Cloud HA VPN with BGP on pfSense but customized for a Google Wi-Fi home network and updated with some pfSense changes that I had to figure out.

Home Network

When we built the house in 2015, I set up a 3-pack of original Google Wi-Fi (not the “Nest” version) to use as my router and access points throughout the house. Google Wi-Fi is great – it’s very easy to get started. Once deployed, it can generally be thought of as “set it and forget it”. However, it doesn’t provide all the bells and whistles that some of the more advanced home routers offer, but this can be a blessing in disguise because there is less to fiddle with and potentially mess up. Most importantly, it delivers a reliable experience for the family.

My home lab is a simple Intel NUC with a dual-core Intel Core i3-6100U 2.3 GHz CPU and 32 GB RAM. It runs a standalone instance of VMware ESXi 7. I run a few VMs when I need to, but nothing “production”.

Site-to-Site VPN with Google Cloud

Since switching to a full-time focus on cloud engineering and architecture, one of the things I’ve always wanted to try is to set up a Site-to-Site IPsec VPN tunnel with BGP between my home and a virtual private cloud (VPC) network to better understand the customer experience for VPN configuration and network management.

As I mentioned earlier, Google Wi-Fi is rather basic and doesn’t offer any VPN capability, but it can do port forwarding, and when combined with a virtual appliance, that’s all we really need.

pfSense overview

Since Google Wi-Fi does not have any VPN capabilities, I intend to use a pfSense virtual appliance in ESXi to act as a router for virtual machine clients on an internal ESXi host-only network. The host-only network will have no physical uplinks so the only way out to the Internet or the private cloud network is through the pfSense router.

pfSense will provide DHCP, DNS, NAT, and routing/default gateway services only to the clients on the internal host-only network.

Because of the way it is designed, no other router can sit between Google Wi-Fi and the internet without some loss of functionality, including mesh networking, and we do not want to disturb the other users of the network (family), so we will create an isolated network with pfSense on the ESXi host.

pfSense VM will have two virtual NICs:

  • NIC1 is connected to the “VM Network” and has Internet access through the home network.
  • NIC2 is connected to the internal isolated “host-only” network which does not have any connectivity to the Internet.
Network diagram showing connectivity between the Internet and pfSense running as a virtual machine straddling two networks in the ESXi host on the Intel NUC.

pfSense installation

Netgate has a comprehensive guide on how to install the pfSense virtual appliance on VMware ESXi.

Following are some installation tips that I found to be helpful:

  • Upload the pfSense ISO to an ESXi datastore – don’t forget to unzip it first.
  • When creating a new VM for pfSense on ESXi 7, select Guest OS family “Other” and Guest OS version “FreeBSD Pre-11 versions (64-bit)”
  • VM Hardware:
    • Set CPU to 2
    • Set Memory to 1 GB
    • Set Hard Disk to 8 GB
      • Make sure the SCSI adapter is LSI Logic Parallel
    • Set Network Adapter 1 to the home/internet network, mark it as Connect
    • Add a second Network Adapter for the host-only network, leave it as E1000, mark it as Connect
    • CD/DVD Drive 1 set to Datastore ISO file and browse for the pfSense ISO, mark is as Connect

Boot the VM off the ISO, accept the defaults and let it reboot.

On first boot, the WAN interface will have a DHCP IP from the home network (Google Wi-Fi assigns in the 192.168.86.0/24 range) and the internal-facing LAN interface will have a static IP of 192.168.1.1. If this is incorrect, use the “Assign interfaces” menu item in the console to set which NIC corresponds to WAN and LAN appropriately. Use the ESXi configuration page to find the MAC address of each NIC and which network it is connected to in order to configure them appropriately.

Port-forward IPSec ports to pfSense

After pfSense is installed, we need to port-forward the external Internet-facing IPSec ports on the Google Wi-Fi router to the pfSense VM.

Google has recently relocated management of Google Wi-Fi to the Google Home app. Look for the Wi-Fi area, click the “gear” icon in upper right, select “Advanced networking”, and then “Port management”.

Use the “+” button to add a new rule. Scroll through the IPv4 tab to find the new “pfSense” entry and select it. Verify the MAC address shown is the same as the pfSense VM’s WAN NIC connected to the home network (“VM Network”). Add an entry for UDP 500. Repeat for UDP 4500.

Note: It is not possible to configure port forwarding unless the internal target is online. The Google Home app will only show a list of active targets that are connected to the network. If the pfSense host is not present, verify the VM is powered on and connected to the home network.

Port forwarding rules for inbound UDP/500 and UDP/4500 forwarding to the pfSense NIC1 on the home network

By default, pfSense only allows management access through its LAN interface, so the next step is to deploy a Jump VM with a web browser on the host-only network. Use the VM console to access the Jump VM desktop and launch the browser since it will not be reachable on the home network (in case you wanted to RDP). Verify it has a 192.168.1.0/24 IP. It should also be able to reach the internet but this is not required.

pfSense initial configuration

On the Jump VM, browse to https://192.168.1.1, accept the certificate warning, and log in as admin with password pfsense. Step through the wizard.

Some tips:

  • Set the Hostname and Domain to something different than the rest of the network.
  • Configure WAN interface: Uncheck “Block RFC1918 Private Networks”
  • Set a secure password for admin
  • Select Interfaces | WAN
    • Uncheck “Block bogon networks” if selected
    • Click Save and then Apply

Google Cloud VPN configuration

Use the Google Cloud Console for the following steps:

  • Networking | VPC Networks
    • Create a new VPC network or use an existing one. Should have Dynamic routing mode set to Global.
  • Networking | Hybrid Connectivity | VPN
    • Create a new VPN Connection
      • Classic VPN
      • Select VPC network created earlier
      • Create a new external IP address or use an available one
      • Tunnels – set Remote peer IP address to the home external internet IPv4 address (from home, visit https://whatismyipaddress.com/ and note the IPv4 address)
      • Generate and save the pre-shared key – it is needed for pfSense.
      • Select Dynamic (BGP) routing option and create a new Cloud Router. Set Google ASN to 65000. Create a new BGP session, set Peer ASN (pfSense) to 65001. Enter Cloud Router BGP IP of 169.254.0.1, and BGP peer IP (pfSense) of 169.254.0.2
      • Note the external public IP address of the Cloud VPN.

pfSense IPsec configuration

Use the Jump VM web browser for these steps in the pfSense web interface:

  • System | Advanced | Firewall & NAT tab: Allow APIPA traffic
  • VPN | IPSsec, Add P1
    • Set Remote Gateway to the Google Cloud VPN external public IP recorded previously.
    • Set “My identifier” to be “IP address” and enter the external public IPv4 address of the home network recorded earlier.
    • Enter the Pre-Shared Key generated for the Google Cloud VPN tunnel
      • It may not be possible to paste the key in to the VM console – visit https://pastebin.com and create a new “Burn after reading” paste with the key and then access the paste from the Jump VM to retrieve the key.
    • Set the Phase 1 Encryption Algorithm to AES256-GCM
    • Set Life Time to 36000
  • Save and apply changes
  • Show P2 entries, Add P2
    • Mode: Routed (VTI)
    • Local network: Address, BGP IP 169.254.0.2
    • Remote network: Address, BGP IP 169.254.0.1
    • Protocol: ESP
    • Encryption Algorithms
      • AES, 128 bits
      • AES128-GCM, 128 bits
      • AES192-GCM, Auto
      • AES256-GCM, Auto
    • Hash Algorithms: SHA256
    • PFS key group: 14 (2048 bit)
  • Save, Apply changes
  • Click on Firewall | Rules, select IPsec from along the top, Add a new rule
    • Set Protocol to Any
  • Save rule, Apply changes

pfSense BGP configuration

Go to System | Package Manager, click on Available Packages, search for “frr”. Install “frr”. This will connect out to the Internet to retrieve the packages. Wait for it to complete successfully.

Go to Services | FRR Global/Zebra

  • Global Settings
    • Enable FRR
    • Enter a master password.
    • Set Syslog Logging to enabled and set Package Logging Level to Extended
  • Click on Access Lists along the top
    • Add a new Access List
      • Name: GCP
      • Access List Entries: set Sequence to 0, set Action to Permit, check box for Source Any
      • Click Save
  • Click on Prefix Lists along the top
    • Add a new Prefix List
      • Name: IPv4-any
      • Prefix List Entries: set Sequence to 0, set Action to Permit, check box for Any
      • Click Save
  • Click on BGP along the top
    • Enable BGP Routing
    • Set Local AS to 65001 (GCP Cloud Router was set to 65000)
    • Set Router ID to 169.254.0.2 (GCP Cloud Router was set to 169.254.0.1)
    • Set Hold Time to 30
    • At the bottom, set Networks to Distribute to 192.168.1.0/24
    • Click Save
  • Click Neighbors along the top, add a new Neighbor
    • Name/Address: 169.254.0.1
    • Remote AS: 65000
    • Prefix List Filter: IPv4-any, for both Inbound & Outbound
    • Path Advertise: All Paths to Neighbor
    • Save

Checking status

In pfSense, click on Status | FRR

In the Zebra Routes area, you should see “B>*” entries for subnets in the GCP VPC “via 169.254.0.1” (BGP IP of GCP Cloud Router)

In the BGP Routes area, should see Networks listed for GCP VPC subnets, with Next Hop of 169.254.0.1 (BGP IP of GCP Cloud Router) and Path of 65000 (GCP Cloud Router ASN)

BGP Neighbors should list 169.254.0.1 as a neighbor with remote AS 65000, local AS 65001 and a number of “accepted prefixes” which are the VPC subnets.

Visit the Cloud VPN area in Google Cloud Console, the VPN Tunnel should show Established, and the BGP session should also show BGO established.

Visit the VPC and click on its Routes. There should be one listed for the on-premise pfSense LAN, 192.168.1.0/24 via next hop 169.254.0.2.

Validating connectivity

At this point, VMs in GCP should be able to communicate with VMs in the on-premise pfSense LAN 192.168.1.0/24 network.

Create a GCE instance with no public IP and attach it to the VPC subnet. Make sure firewall rules apply to the instance permit ingress traffic from 192.168.1.0/24 network and permit the appropriate ports and protocols:

  • icmp
  • TCP 22 for SSH
  • TCP 3389 for RDP

Wrapping up

If things are not connecting, double-check everything, but also be sure to check the logs in pfSense and in GCP Cloud Logging. The most frequent issue I encountered was a mismatch of proposals by not selecting the right ciphers for the tunnel, or not setting my identifier properly. Also consider how firewall rules will impact communication.

Finally, the settings outlined here are obviously not meant for production use. I don’t claim to understand BGP any more than what it took to get pfSense working with Cloud VPN, so some of the settings I recommend could be enhanced and tightened from a security perspective. As always, your mileage may vary.

Changing GCP machine and disk size

Changing a Google Cloud (GCP) Compute Engine (GCE) virtual machine size or disk size are typical “Day 2” activities that an operations team may perform as the needs of the application running in the VM evolve past what was initially specified during deployment.

As a best practice, all infrastructure deployment and modifications should be performed via Infrastructure-as-Code (IaC) where resources are defined using a declarative language such as Terraform and then a deployment process runs to create or update the resource using cloud APIs.

Changing machine size

For a given GCP Terraform google_compute_instance, change the machine_type value to one which meets the cpu/memory requirement:

  • See API machine type names (third-party site)
  • See GCP Terraform provider documentation
    • In the google_compute_instance set allow_stopping_for_update = true to avoid having to manually stop the VM prior to making the update in Terraform. With this argument set, Terraform will stop the instance during terraform apply and then start the instance when complete.

Increasing disk size

See Working with persistent disks  |  Compute Engine Documentation

Disk sizes may only be increased, not decreased.

Google recommends taking a snapshot of a disk prior to increasing its size. The snapshot is for safekeeping in case there is an issue with the overall process so that the data is not lost.

If a smaller size is set, terraform will plan to destroy the disk and create a new one.

  • This can be prevented by setting the lifecycle argument on the google_compute_disk resource causing the plan to fail:
lifecycle {
 prevent_destroy = true
}

Increasing the size of a disk can be done via Google Cloud Console, gcloud command line, or API/terraform. For IaC purposes, only terraform should be used.

Increasing boot disk size

VMs using public images automatically resize the root partition and file system after you’ve resized the boot disk on the VM and restarted the VM. If you are using an image that does not support this functionality, you must manually resize the root partition and file system.

Working with persistent disks | Compute Engine documentation

If the VM was created in terraform and did not have a boot disk created separately with a specific size, setting a new boot disk size in the google_compute_instance resource will cause terraform to recreate the VM.

VMs should be created in terraform with separate/independently-created boot & data disk google_compute_disk resources in order to safely increase the size of the disks in the future.

Create VMs in terraform with separate/independent boot & data disks.

Example:

data "google_compute_image" "debian9" {
 project = "debian-cloud"
 name = "debian-9-stretch-v20211105"
}

resource "google_compute_disk" "test-np5-boot" {
 project = <project_id>
 name = "test-np5-boot"
 type = "pd-standard"
 zone = "us-central1-a"
 size = 30

 image = data.google_compute_image.debian9.self_link
}

resource "google_compute_disk" "test-np5-data1" {
 project = <project_id>
 name = "test-np5-data1"
 type = "pd-standard"
 zone = "us-central1-a"
 size = 10
}

resource "google_compute_instance" "test-np5" {
 name = "test-np5"
 machine_type = "e2-micro"
 zone = "us-central1-a"
 project = <project_id>

 allow_stopping_for_update = true

 boot_disk {
  source = google_compute_disk.test-np5-boot.name
 }

 attached_disk {
  source = google_compute_disk.test-np5-data1.id
 }

 network_interface {
  subnetwork = "uscentral1"
  subnetwork_project = shared_vpc_host_project
 }

 metadata = {
  serial-port-logging-enable = true
  serial-port-enable = true
 }
}

Be sure to specify a specific name for the google_compute_image (as shown) so that the boot disk is not flagged to be recreated when a new version is released.

By default, a boot disk created separately from the VM will still be deleted when the instance is deleted. Set auto-delete = false in the boot_disk section of the google_compute_instance to prevent this behavior.

To increase the size of the boot disk, change the size value for the google_compute_disk called by google_compute_instance boot_disk argument:

resource "google_compute_disk" "test-np5-boot" {
 project = <project_id>
 name = "test-np5-boot"
 type = "pd-standard"
 zone = "us-central1-a"
 size = 40

 image = data.google_compute_image.debian9.self_link
}

Terraform will update the size of the boot disk. The VM will not be restarted automatically, even if google_compute_instance has allow_stopping_for_update set to true because the change is being made to the google_compute_disk resource, not the VM instance.

Manually restart the VM during a maintenance window. If using a public image, or an image customized from a public image, the OS boot disk and partition should be expanded automatically.

If not, see Resize the file system and partitions.

Adding a new data disk

In terraform, create a new disk using the google_compute_disk resource. Example:

resource "google_compute_disk" "data1" {
 project = <project_id>
 name = "test-np4-data1"
 type = "pd-standard"
 zone = "us-central1-a"
 size = 10

 lifecycle {
  prevent_destroy = true
 }
}

Modify the terraform VM google_compute_instance resource to include the attached_disk argument which references the google_compute_disk resource.

Example:

attached_disk {
 source = google_compute_disk.data1.id
}

Increasing data disk size

Modify the terraform google_compute_disk data disk size argument:

resource "google_compute_disk" "test-np5-data1" {
 project = <project_id>
 name = "test-np5-data1"
 type = "pd-standard"
 zone = "us-central1-a"
 size = 20
}

Terraform will update the size of the data disk. The VM will not be restarted automatically, even if google_compute_instance has allow_stopping_for_update set to true because the change is being made to the google_compute_disk resource, not the VM instance.

Modern OSs should automatically detect the capacity change of the data disk. If not, perform a rescan using the method provided by the operating system.

For exact steps to increase the size of a filesystem after increasing the disk size, see Resize the file system and partitions (select “Linux instances” or “Windows instances”).

My avatar background

The avatar that I use online is one I’ve had since 2008, when it was created for me by a marketing firm as part of VMworld 2008 design and branding.

I think personal branding in the public sphere is important. So when given the opportunity, I always use this avatar (or via Gravatar) as my profile picture – except on more professional platforms like LinkedIn where I use a professional photo, or more personal platforms like Facebook.

I like the simplicity of it – the simple solid colors, basic expression. It’s instantly recognizable, and if someone has seen it before, they remember to associate it with me.

The avatar was made as a cartoon version of myself captured from a video where I’m being interviewed about VMware VDM (which eventually became View, and then Horizon View). The interview segment starts with me as the cartoon and then it morphs in to video footage of me speaking about VDI.

My coworker and I were invited to a private customer beta session at the VMware campus on Hillview Ave in Palo Alto in July 2008 to learn about, use, and give feedback on what would eventually become VMware View, and later, Horizon View. After the beta session, I and a few others participated in the video interview about how we were using VDI.

At the time, I worked for a healthcare organization which was really at the forefront of virtual desktops, having deployed them in 2007 as part of a move to a new hospital campus, including a datacenter relocation. Famously, no PCs were purchased for the majority of the building, rather, thin terminals were placed and we went all-in on VDI on VMware.

2008 was already a busy year for press about the organization’s use of VDI – a VMware press release in February discussed the hospital move and drive towards VDI.

An interview and photo shoot featured us on the cover of Network World Magazine May, 2008 issue.

Finally, I presented details of our VDI deployement at a well-attended West Michigan VMware User Group held at the hospital in a large conference room in November, 2008. At the time, much of the automation was developed in-house and worked quite well, so we were wary of switching to a commercial product.

The video interview at VMware ultimately aired as part of the VMworld 2008 conference kickoff at The Venetian Hotel in Las Vegas in August, 2008. VMware View was announced at the conference and released in December, 2008.

I could not attend in person but a review of photos taken at the event show the same style used throughout the conference, with many different faces rendered in this simple cartoon format.

The look was created by Emotive Brand which developed the strategy, messaging and design of the VMworld experience for several years including 2008.

Another version was also developed which featured a different shirt and color background.

I alternated between versions for a time before settling on the yellow-background version.

It’s quite convenient to have a go-to avatar for use when needed. I always enjoy finding new places to use it!

Google Cloud Managed Service for Microsoft Active Directory

Overview

Google Cloud Managed Service for Microsoft Active Directory (“Managed AD”) is a premium managed service offered by Google to host and manage a customer’s new Microsoft Active Directory (AD) domain in Google Cloud.

What is Active Directory?

According to the Active Directory page on Wikipedia,

Active Directory (AD) is a directory service developed by Microsoft for Windows domain networks. It is included in most Windows Server operating systems as a set of processes and services.

A Windows server running the Active Directory Domain Service (AD DS) role is called a domain controller. It authenticates and authorizes all users and computers in a Windows domain type network, assigning and enforcing security policies for all computers. Computers that have been “joined” to the domain are under the security policy umbrella of the domain.

Active Directory uses Lightweight Directory Access Protocol (LDAP) versions 2 and 3, Microsoft’s version of Kerberos, and DNS.

Active Directory

Organizations of any size ranging from a small number of Windows servers or desktops to the largest enterprises with thousands of servers most likely have an Active Directory domain. These can be simple configurations with just a few domain controllers, or incredibly complex configurations with multiple sites, clusters, and different types of domain controllers. All types of organizations consider it a critical piece of infrastructure for their Authentication, Authorization, and Auditing (AAA) platform.

Any number of internal and external enterprise self-hosted or Software-as-a-service (SaaS) applications and hardware appliances (storage arrays for example) can integrate with and rely on AD for authenticating access to the application and its data.

The ability to interact with AD is built-in to Windows Servers and Desktop operating systems, and has been extended to Linux through open LDAP implementations or other methods.

What is Google Cloud Managed Active Directory?

Google Cloud Managed Service for Microsoft Active Directory” was made generally available in February of 2020 as an “Active Directory-as-a-service” for customers that need Active Directory but do not want to manage the underlying aspects of it, such as supporting/managing/patching/securing the underlying Windows operating system, security best practices around AD configuration, or other areas.

Implementation

When first deployed, the service consists of two AD Domain Controller Google Compute Engine (GCE) instances per region in non-overlapping zones, in a private Google-managed project with a VPC and Cloud DNS that is created solely for the Managed AD domain and is not shared with other customers.

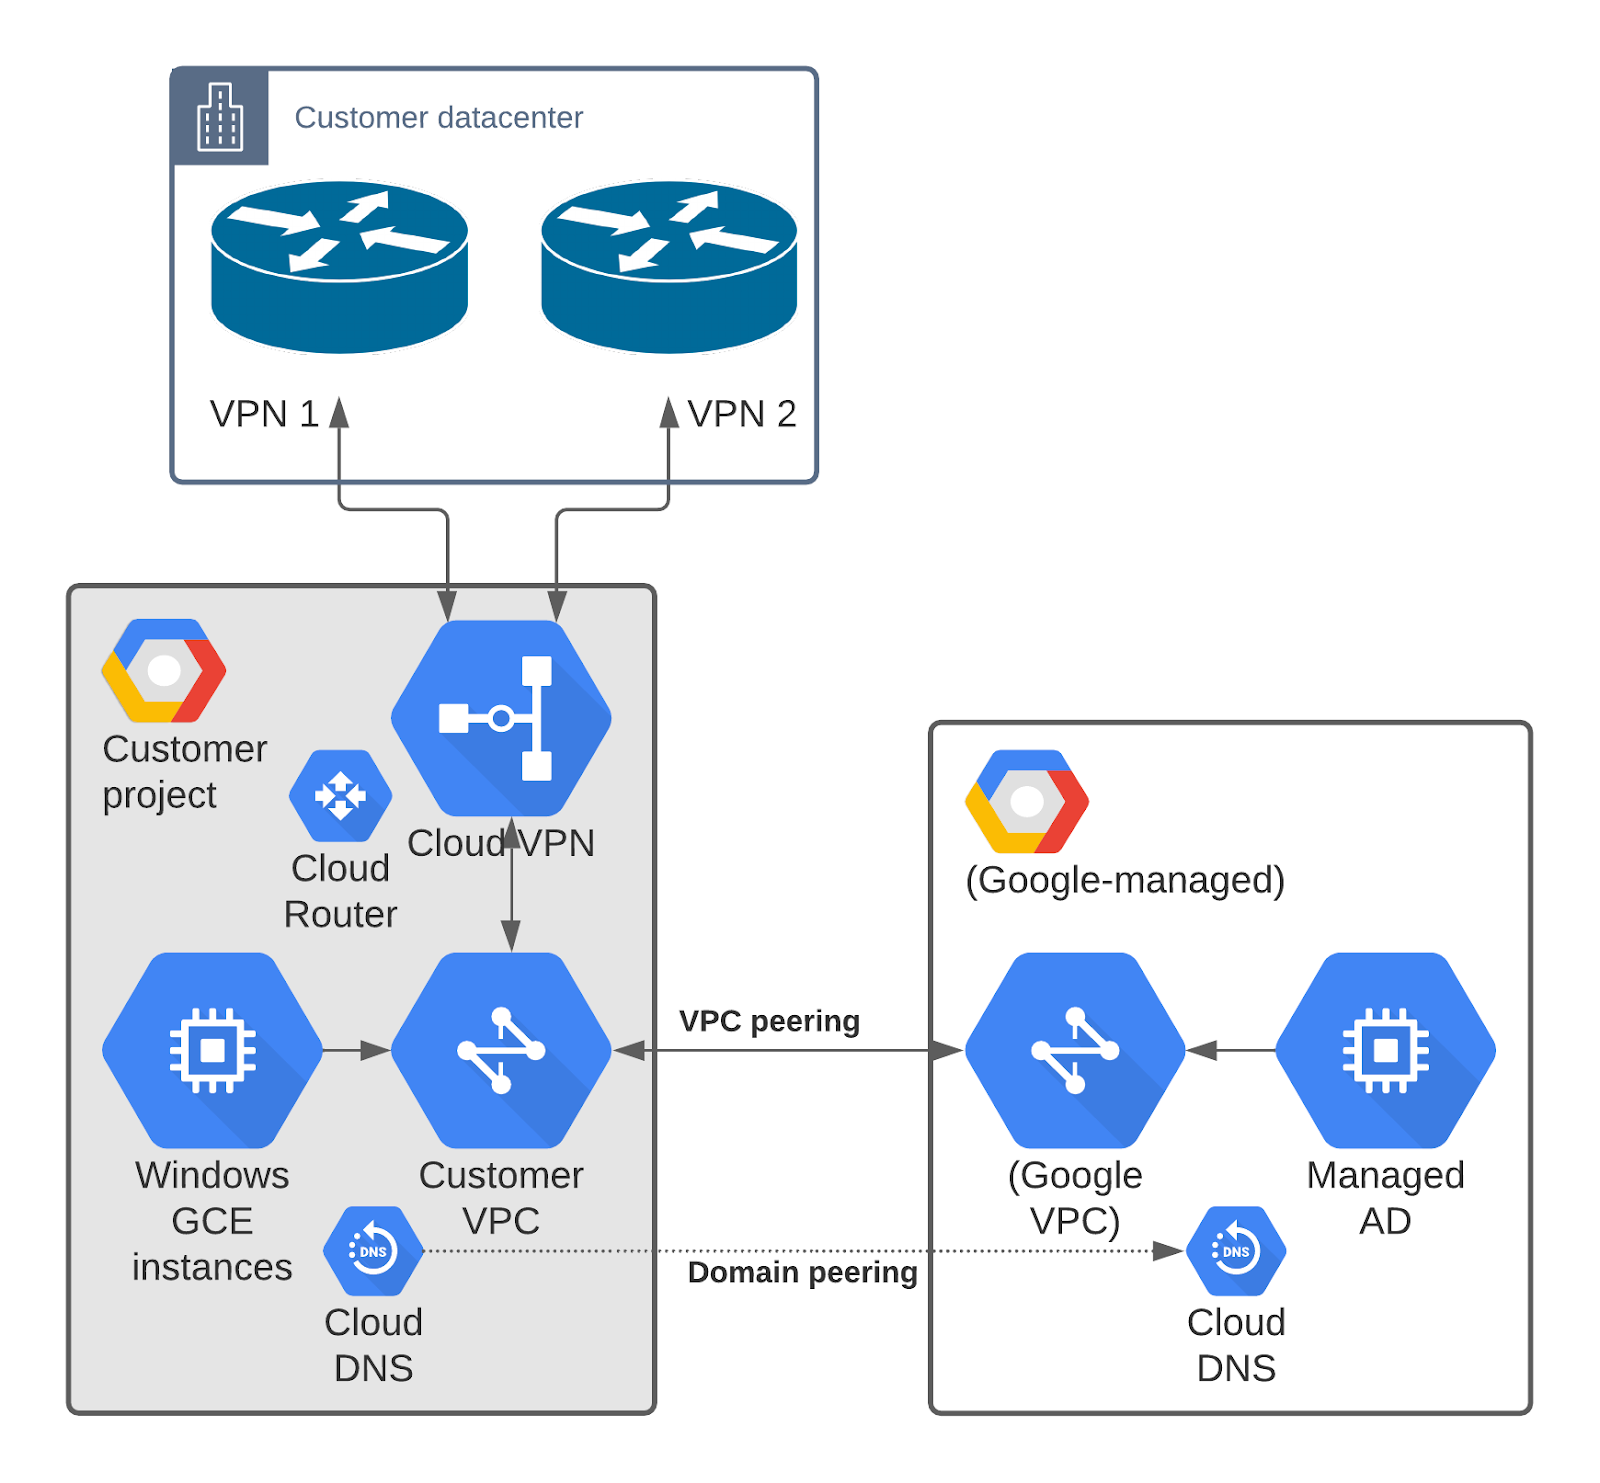
The private Google-managed project is not visible or accessible to the customer, but the Domain Controller instances are reachable over the VPC peering connection established between the customer’s VPC and the Google-managed VPC.

The domain can be expanded to four additional regions. Each region is about $292/month.

Google indicates the customer is not charged additionally for the necessary Windows licensing to operate the service. That being said, there is not an option to BYOL Windows licensing for Managed AD. See Microsoft Licensing Guide for Google Cloud for general details.

Additionally, if not already present, Cloud DNS is enabled and configured in the customer project with a domain peering zone for the AD domain which points to the Domain Controller instances in the Google-managed project. This enables GCE instances or other servers to resolve the Managed AD domain using Cloud DNS.

Managed AD is accessible to GCE servers in the project or other VPCs as long as appropriate peering and routing have been configured. On-premise servers are also able to access Managed AD via established VPN or Interconnect connections with similarly appropriate routing and DNS configuration.

Initially the Managed AD VPC is peered with a single customer VPC, but can be can be peered to 5 additional VPCs to permit additional access to the service by hosts in other VPCs.

Managed AD is generally compatible with identity providers such as Okta, but may require special configuration in order to work properly. During installation, the Okta agent attempts to create its own service account which will fail. If the service account is created manually ahead of time, and granted limited permissions, the Okta installer can use the service account instead of creating a new one, and then installation will succeed.

Group Policy is also supported in Managed AD in specific OUs only.

Backups take place every 12 hours, and on-demand backups can be triggered when needed. Restoration from backups is also available and can take up to 90 minutes, during which the domain is not available.

Limitations

As a managed service, there are limitations to what a customer can do with Managed AD. These limitations ensure the service remains a “managed” service and not a “co-managed” service.

Managed AD cannot become part of an existing AD domain, whether on-premise or in GCP. Domain Controllers for Managed AD cannot be deployed on-premise or as GCE instances in a customer project – they run only in the Google-managed project in Google Cloud.

A user cannot RDP to or otherwise access Domain Controller servers, except as an authentication mechanism to a domain resource.

The domain and underlying GCE instances cannot be backed up using 3rd-party backup utilities since they are not part of the customer’s project or organization.

Active Directory DHCP cannot be used, but Active Directory DNS is part of the deployment and integrated with Cloud DNS.

The “Domain Admins” group long-beloved by administrators is not accessible to the customer. Instead, the customer must use the “Cloud Service Administrators” Global group in the “Cloud Service Objects” OU which grants customer-level administrative permissions to the users who would typically utilize the Domain Admin role.

If using Okta, the Okta service account should be a member of “Cloud Service Administrators” and will then be able to provision accounts in the “Cloud” OU.

The “Cloud Service All Administrators” Domain Local group is available for use and has the same level of permissions as “Cloud Service Administrators” but due to its group type, can include users from other trusted domains.

Other administrative-level groups such as “Enterprise Admins” “BUILTIN\Administrators”, and “Schema Admins” are not available to the customer.

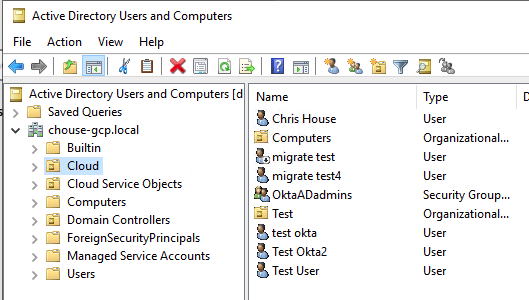
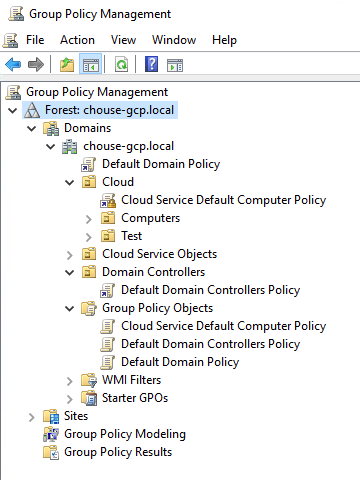
Various AD objects are automatically created in the Managed AD domain – only the “Cloud” OU and any sub-OUs within it are customer managed. All customer users, groups, and computer objects must be placed in the “Cloud” OU.

Any customer Group Policies can only be attached at the “Cloud” OU level or a sub-OU as appropriate. The default domain policy and other pre-existing policies cannot be modified.

When the Managed AD domain is deployed, an initial “setupadmin” account is created a member of “Cloud Service Administrators”. This account should be used to establish other administrative accounts. Once other accounts are present, the account should no longer be used. Its password can be reset as needed via the Google Cloud Console.

Some domain-level permissions are currently restricted, such as setting sIDHistory on an object. This may impact third-party management or migration utilities when interacting with or migrating to a Managed AD domain.

However, the domain-level administrative task of establishing trusts can be performed by the customer, but only through the Google Cloud Console instead of the Active Directory Domains & Trusts snap-in.

UPDATE: As of Sept 6, 2022, the ability to extend the schema with custom attributes to support utilities such as LAPS is now available in public preview.

Deployment

To deploy, access the Security area of Google Cloud Console and select “Managed Microsoft AD“. A number of different IAM roles are available. The role “roles/managedidentities.admin” has all necessary permissions.

Some prerequisites must be established prior to creating a new domain in a Google Cloud project:

  • Fully qualified AD domain to use which fits the naming standard for the organization and should not conflict with any existing domain inside or outside the organization. Domains do not need to be registered with any domain registry.
  • VPC networks to peer with
  • /24 CIDR range (subnet) to use for the Managed AD domain controllers, which does not conflict with any other CIDR range on-premise or in the customer VPCs. The CIDR range cannot be smaller than a /24.
  • Initial Admin username to create. Default is “setupadmin” but can be changed to suit the customer.

If using Shared VPCs, Managed AD should be deployed to the host project so that it can peer with the VPC.

Management

Once the domain is deployed, it can be managed like any other AD domain using established Microsoft utilities.

Prior to being able to manage the domain, a Windows GCE instance should be deployed and then joined to the domain by providing the domain FQDN and the “setupadmin” username and password. The resolution of the Managed AD domain FQDN is made possible by the domain peering in Cloud DNS which the GCE instance will rely on.

Once joined to the domain and rebooted, RDP to the instance as the “setupadmin” user and then install several different Features from the Roles & Features area of Windows Server Manager:

  • Group Policy Management
  • Remote Server Administration Tools: AD DS and AD LDS Tools, DNS Server Tools (DHCP Server Tools are not necessary)

To manage AD objects, use Active Directory Users and Computers as usual, keeping any changes within the “Cloud” OU.

Use Group Policy Management to manage Group Policies as usual, again confining any modifications to the “Cloud” OU.

On-premise access to Managed AD

As mentioned earlier, due to the nature of the implementation of Managed AD through a VPC peer, other networks are able to access Managed AD as long as appropriate peering and routing is configured, including on-premise networks and servers.

First, to help on-premise devices know how to reach the Managed AD subnet, the Cloud Router associated with the VPN or Interconnect attached to the same project as Managed AD must advertise a static route for the Managed AD subnet, as well as the Cloud DNS query source IP range.

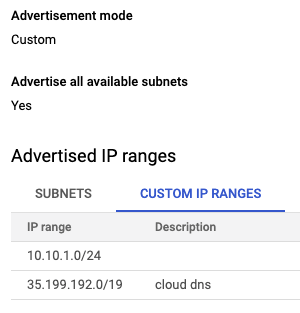
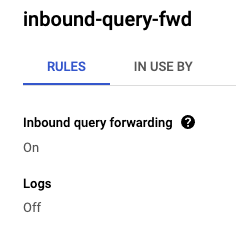
Next, Cloud DNS in the project that has the Managed AD domain where the domain peering zone for Managed AD is present must be configured with a DNS policy permitting inbound query forwarding and associated with the necessary VPCs. This will reserve IPs in all subnets on the VPCs for Cloud DNS. The IPs will be capable of responding to DNS queries sent by on-premise servers.

Active Directory Trusts

Managed AD can establish one-way or two-way trusts with self-managed AD domains, either on-premise or within GCP.

Proper DNS resolution is critical for trusts to be established and maintained.

In order for a self-managed AD domain to trust the Managed AD domain, the self-managed Active Directory DNS service must be configured with a Conditional Forwarder for the Managed AD FQDN using the Cloud DNS inbound query forwarding IPs that were previously reserved from associated VPCs.

In the screenshot below, 10.10.10.5 is a VPC subnet IP reserved for Cloud DNS so the self-managed AD domain “chouse.corp” can resolve the Managed AD domain “chouse-gcp.local” by forwarding DNS requests to 10.10.10.5.

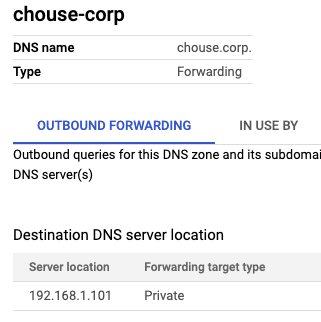
Conversely, Cloud DNS must be configured with private zone forwarding to forward DNS requests for the self-managed AD domain to the self-managed AD domain DNS servers.

Below, a private forwarding zone is created called “chouse.corp” with a Destination DNS server of 192.168.1.101, which is the domain controller/DNS server for “chouse.corp”. DNS requests by GCE instances or Managed AD for “chouse.corp” to Cloud DNS will be forwarded to 192.168.1.101. From 192.168.1.101’s perspective, the requests will originate from the Cloud DNS query source IP range 35.199.192.0/19 even though the traffic comes over the VPN, so it is important that a static route be advertised for this network so that requests can return back over the same VPN connection.

Once DNS configurations are in place both in Cloud DNS and self-managed AD DNS, use the Google Cloud Console to create a new trust between Managed AD and the self-managed domain. This process only establishes the trust on the Managed AD side. The trust from the self-managed side will be established separately.

Simply provide the FQDN of the self-managed domain, the DNS server IPs of the self-managed domain (which will be configured in Managed AD’s DNS service as Conditional Forwarders) and finally a trust password which needs to be used on both sides of the trust, but will be automatically changed periodically by Active Directory and does not need to be saved. The trust password acts like a pre-shared key in that both sides of the trust need to use the same password when establishing and maintaining the trust.

Use Active Directory Domains and Trusts in the self-managed domain to establish the trust going the other way, to Managed AD, by providing the FQDN of the Managed AD domain and the trust password. Be sure to match the trust Type and Direction. Do not validate the trust when prompted to provide Managed AD credentials – this will fail.

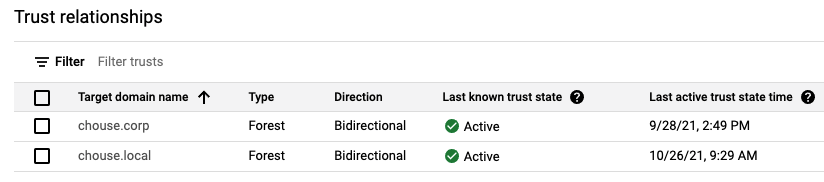
Verify in Cloud Console that the trust is now Active.

Going forward

Now that Managed AD has been deployed, routing and DNS has been configured, and a trust has been established, Windows servers and desktops on-premise, in GCP, or elsewhere can join the Managed AD domain and AD users in trusted domains can access these servers with appropriate permissions.

UPDATE: Good overview of trusts in Active Directory

Story time in the PayPal Facebook Ad Fraud Department

On Sept 13, 2021, I was served a Facebook ad for $79 laptops.

The comments on the ad are all from the same time period, from many different people, and include photos of laptops purportedly purchased from seller. Commenters describe how great the laptops are, and the seller is answering questions.

The Site

The ad points to a website with a curious domain: httpx://gaybondagetube.com/ – it’s not porn, or at least is not currently, and is set up as an online store. There are a few different Dell laptop models to choose from. The prices are all under $100. What a deal!

Payment is only accepted via PayPal. There is only one shipping method.

Now, this is all obviously fake. If a price is too good to be true, then it’s not real, right? But, the fact that they only accept PayPal had me intrigued. After all, PayPal is famous for its Guarantee: https://www.paypal.com/us/webapps/mpp/paypal-safety-and-security

I figured I’m either going to get a really cheap laptop or I’m going to get refunded by PayPal when it obviously doesn’t show up – I go ahead and order one, paying $99 through PayPal backed by my credit card. With credit card protection on top of PayPal, I shouldn’t be out any actual funds. I get a random discount of 10%!

After checkout, there is no order confirmation email and I didn’t screenshot the order page.

A short while later, the PayPal charge comes through for $113. This is weird because that’s higher than the total at checkout. There is no explanation for the additional $14.85. I’m willing to let it slide and see what happens.

The Dispute

After a week with no communication, no tracking information, I get tired of waiting around and file a dispute with PayPal. I select the option that says the item was never received. PayPal contacts the seller. After a few days, PayPal closes the dispute in the seller’s favor! The seller provided a tracking number through the dispute which showed it was delivered in my zip code!

The tracking number shows something was shipped a few days after my order via DHL from Hebron, KY – this fits with the narrative the seller provided in response to a question comment on the Facebook ad.

After a few days, the package reaches my local post office and is marked as Delivered in/at my mailbox, the day before I opened the dispute! Amazing!

I check my security cameras – thankfully we did have packages delivered that day so I have an image of our mail carrier leaving the mail & packages on our porch – not in our mailbox as the tracking indicated. After she delivered them, I went out and immediately brought them in. Spoiler alert, I don’t remember opening a package containing a laptop. And nothing was left in the mailbox.

Now that I have the tracking number, I dig through the recycling to find the boxes that were delivered that day. The tracking number obviously doesn’t match any of them. This is good, but I start to panic. USPS tracking says it was delivered, but I don’t have it, and PayPal only cares that it was “delivered”. I’m sure the mail carrier didn’t lose it or steal it, she’s great – but maybe that’s what the seller is angling for.

At this point, I plan to visit the post office to have a chat.

Paying a visit

At the post office, I state my issue and provide the tracking number. I’m handed a receipt showing that both the origin and destination is my zip code. This does not make any sense. They verbally tell me that the recipient of the package for that tracking number is not my home address. They write on the receipt the phone number of the USPS Inspector General so I can lodge a complaint.

Also seen on the receipt is the class of service: the seller used Parcel Select Light Weight which is for items weighing under 1 pound – the shipment is listed as being 6.7 ounces. Clearly not a laptop.

Not alone

I start doing some more research – the PayPal community forum has a thread that lines up with my experience, even down to the “random discount”. Different website, yet always the same 163.com domain for the seller email address: https://www.paypal-community.com/t5/Security-and-Fraud/Is-that-legit-Dell-Inspiron-17-7000-i7-11th-generation-for-88/m-p/2664021/highlight/false#M3746

In the forum thread, they describe receiving masks or some other small item, not a laptop. I didn’t receive anything.

I open a new dispute with PayPal choosing to report unauthorized activity – PayPal helpfully will not let you choose “Item not received” again on a transaction where a dispute was already closed for that same reason. PayPal again declines my dispute because the activity was authorized. Fair, I suppose.

PayPal duped

Now I’m irritated because the seller has obviously figured this out – they can always get PayPal to find in their favor if they can provide a tracking number showing successful delivery in the recipient’s zip code. PayPal doesn’t have access to see the exact destination address, only the Post Office can, so PayPal always finds in the seller’s favor and closes the disputes when tracking said an item was delivered.

Never gonna give up

Time to start hammering away at the PayPal customer service message center. To bypass the automated PayPal Assistant I ignore its options and type “customer service”. I lay it all out. Dozens of furious and irritated messages. Hours later, PayPal Support asks me to talk to the post office again and request documentation on official letterhead which indicates I was not the recipient of the package.

Paid a visit to the post office again, provide the printed message from PayPal Support with what they need, and waited a few days.

After not hearing anything until mid-week, I call the post office. I speak with a supervisor who takes the tracking number again, understands what I’m asking, and says he’ll investigate. A few days later, I get a call from the supervisor saying he’s going to mail me a letter with his findings. He doesn’t say what he found.

Vindication

The next day (almost a month after the original transaction at this point), the letter arrives from the Post Office and it’s everything I needed – official letterhead, tracking number, saying it was delivered in my zip code, but not to my address.

I take a photo of the letter and upload it to the PayPal Support thread.

Crickets.

Winning

Finally, days later, I bother PayPal Support again and upload the photo of the letter again.

Bam, they refund me the $113.

So that was a giant waste of time, and I hope PayPal investigates the other transactions with that seller because certainly they are all fraudulent, even though the seller can somehow provide a tracking number with successful delivery in the recipient’s zip code.

Questions!

Some questions remain –

  • Who in my zip code received the item that was sent?
  • What was sent?
  • How did the seller arrange something to go through DHL and then the post office? And why bother?
  • How does the seller feel knowing they lost this battle?

You know it was a scam, right?

And to answer the obvious, I knew when I was placing the order that it was a scam, but hey, we can hope, right?

https://hbr.org/2009/06/rethinking-trust